
Bài viết này mình sẽ chia sẻ về cách triển khai một dự án mobile mà mình đã làm qua bằng react native, bao gồm các phần sau:
Thư viện áp dụng
Mình tích hợp với kiến trúc dvaJS trong reactJS, để quản lý state (effects, reducers, subscriptions), các bài viết về dva các bạn có thể xem thêm tại https://luuxuantruong.info/tag/dvajs/
Kiến trúc thư mục
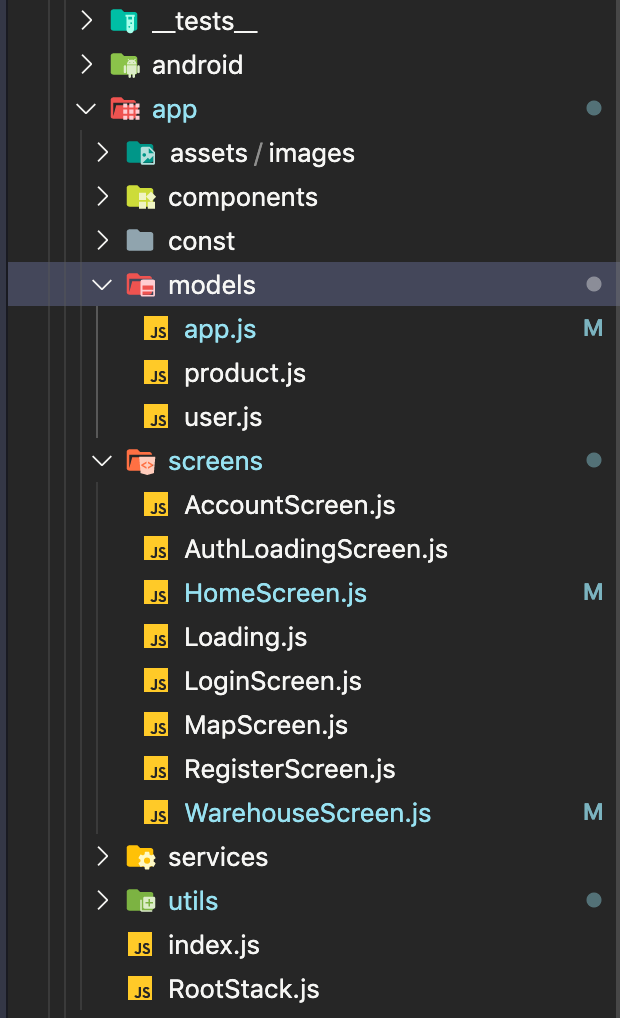
Đầu tiên mình tạo thư mục app cùng cấp với thư mục android, ios. Trong thư mục app mình có chia thư mục như hình trên
- assets: chứa file assets của ứng dụng, bao gồm hình ảnh, font, media…
- components: chứa các component sẽ được sử dụng chung của toàn ứng dụng
- models: chứa file quản lý state của toàn bộ ứng dụng
- screens: thư mục chứa file màn hình của ứng dụng, ở đây mình có AuthLoadingScreen, LoginScreen, MainScreen và những màn hình trong ứng ứng
- services: các file để mình tác biệt các hàm api cần gọi chia file theo cấp module, các service này sẽ được gọi bên trong mổi model của ứng đụng
- utils: chứa các hàm tiện ích, như request.js (cung cấp để truy xuất api, ), utils (chứa các hàm tiện ích khác), dva.js (khai báo, khởi tạo ứng dụng với kiến trúc dva)
- RootStack.js: file này để khai báo router của ứng dụng, sẽ có stackNavigation nào, buttomNavigation nào…
- index.js: Khởi tạo và chạy ứng dụng react native, tải kiến trúc dva, tải model và đăng ký chạy ứng dụng
Tương tác API, truy xuất dữ liệu, hiện thị thông báo
Để tương tác với API mình tạo 1 file utils/request.js với các hàm tiện ích (apiGet, apiPost, apiDelete, apiPut). Khi gọi tới các hàm này để trả về dữ liệu thì mình sẽ kiểm tra thêm status của httpCode để hiện thông báo lỗi trong react native bằng thư viện react-native-snackbar. Với react-native-snackbar mình tạo 2 hàm tiện ích là modalError và modelSuccess để dùng cho việc hiện thị lỗi và thông báo thành công trong ứng dụng. Nội dung của hàm modalError và modalSuccess
import Snackbar from 'react-native-snackbar'

export function modalSuccess(msg, duration = SNACKBAR_LENGTH_MEDIUM) {
  Snackbar.show({
    text: msg,
    duration,
    backgroundColor: 'rgba(0,0,0,0.75)'
  })
}

export function modalError(msg, duration = SNACKBAR_LENGTH_MEDIUM) {
  Snackbar.show({
    text: msg,
    duration,
    backgroundColor: 'rgba(0,0,0,0.75)',
    action: {
      text: 'Error',
      textColor: 'red'
    }
  })
}
Nội dung file utils/request.js
/* eslint-disable  consistent-return */
import storage from './storage';

import { toQueryString, modalError } from './utils';

const codeMessage = {
  200: 'The server successfully returned the requested data.',
  201: 'New or modified data is successful.',
  202: 'A request has entered the background queue.',
  204: 'The data was deleted successfully.',
  400: 'The request was made with an error and the server did not perform any operations to create or modify data.',
  401: 'User does not have permission (token, username, password is incorrect).',
  403: 'The user is authorized, but access is forbidden.',
  404: 'The request is made for a record that does not exist and the server does not operate.',
  406: 'The format of the request is not available.',
  410: 'The requested resource is permanently deleted and will not be retrieved.',
  422: 'A validation error occurred when creating an object.',
  500: 'An error occurred on the server. Please check the server.',
  502: 'Gateway error.',
  503: 'The service is unavailable and the server is temporarily overloaded or maintained.',
  504: 'The gateway timed out.',
};

class ErrorWithReponse extends Error {
  constructor(message, response) {
    super(message);
    if (Error.captureStackTrace) {
      Error.captureStackTrace(this, this.constructor);
    }
    if (response) {
      this.name = response.status;
      this.response = response;
    }
  }
}

async function checkStatus(response) {
  if (response.status >= 200 && response.status < 300) {
    return response;
  }
  const errorMessage = codeMessage[response.status] || '';
  modalError(errorMessage)
  const error = new ErrorWithReponse(errorMessage, response);
  throw error;
}

/**
 * Requests a URL, returning a promise.
 *
 * @param  {string} url       The URL we want to request
 * @param  {object} [option] The options we want to pass to "fetch"
 * @return {object}           An object containing either "data" or "err"
 */
export default async function request(url, options) {
  const defaultOptions = {
    headers: {
      'Access-Control-Allow-Credentials': false,
    },
  };
  let qs = '';
  const newOptions = { ...defaultOptions, ...options };
  const token = await storage.get('acccessToken');
  let catchErrorResponse = false;
  if (newOptions.body && !!newOptions.body.catchError) {
    catchErrorResponse = true;
    delete newOptions.body.catchError;
  }
  if (token) {
    newOptions.headers.Authorization = `Bearer ${token}`;
  }
  if (newOptions.method === 'POST' || newOptions.method === 'PUT') {
    if (!(newOptions.body instanceof FormData)) {
      newOptions.headers = {
        Accept: 'application/json',
        'Content-Type': 'application/json; charset=utf-8',
        ...newOptions.headers,
      };
      newOptions.body = JSON.stringify(newOptions.body);
    } else {
      // newOptions.body is FormData
      newOptions.headers = {
        Accept: 'application/json',
        ...newOptions.headers,
      };
    }
  } else if (newOptions.method === 'GET') {
    const optionsClone = { ...options };
    delete optionsClone.method;
    qs = toQueryString(optionsClone);
  }

  return fetch(`${url}${qs ? `?${qs}` : ''}`, newOptions)
    .then(checkStatus)
    .then(response => {
      // DELETE and 204 do not return data by default
      // using .json will report an error.
      if (newOptions.method === 'DELETE' || response.status === 204) {
        return response.text();
      }
      return response.json();
    })
    .catch(e => {
      console.log('e', e);
      const status = e.name;
      if (status === 401) {
        // @HACK
        /* eslint-disable no-underscore-dangle */
        window.g_app._store.dispatch({
          type: 'app/logout',
        });
        return;
      }
      // environment should not be used
      if (status === 403) {
        // router.push('/exception/403');
        return;
      }
      if (status <= 504 && status >= 500) {
        // router.push('/exception/500');
        return;
      }
      if (status >= 404 && status < 422) {
        // router.push('/exception/404');
        return;
      }
      return catchErrorResponse ? e : undefined;
    });
}

export function apiGet(url, options) {
  return request(url, { method: 'GET', ...options });
}

export function apiPost(url, options) {
  return request(url, { method: 'POST', ...options });
}

export function apiPut(url, options) {
  return request(url, { method: 'PUT', ...options });
}

export function apiDelete(url, options) {
  return request(url, { method: 'DELETE', ...options });
}
Trong file request.js mình có cung cấp cái hàm tiện ích để tương tác với API, gồm: apiPost, apiGet, apiDelete, apiPut. Ứng với mổi request mình có kiểm tra accessToken có tồn tại chưa, và gắn vào header của mổi request, mổi response trả về thì thực hiện thêm 3 tác vụ kèm theo
- Nếu có lỗi trả về status code thì dựa vào status để hiện các thông báo lỗi tương ứng và có thể trả về response cho effect được gọi hay không
- Trường hợp có lỗi liên quan tới xác thực người dùng (401) mình sẽ cho chuyển hướng về màn hình login của ứng dụng, các lỗi với các status khác tùy các bạn xử lý (có thể chuyển về các trang thông báo lỗi tương ứng)
- Nếu không có lỗi gì phát sinh thì trả về response để lưu lại trong state
Luồng xác thực người dùng
Ở đây mình áp dụng kiến trúc từ react-navigation flow, các bạn kiểm tra phiên bản mình đang dùng hiện tại là bao nhiêu để áp dụng cho chính xác, hiện tại mình đang dùng react-navigation bản 4.x
Ở hình trên, mình tạo 3 màn hình tương ứng là AuthLoadingScreen, MainScreen và LoginScreen với các nhiệm vụ sau:
- AuthLoadingScreen: sẽ là màn hình được hiển thị đầu tiên của ứng dụng, tại màn hình này mình sẽ kiểm tra người dùng đã đăng nhập hay chưa và điều hướng ứng dụng tới LoginScreen hay MainScreen
- LoginScreen: nếu người dùng chưa đăng nhập thì sẽ điều hướng về màn hình này để nhập thông tin người dùng và đăng đăng
- MainScreen: trong trường hợp người dùng đã đăng nhập rồi thì hiện thị màn hình này
Mã của file RootStack.js
const AppNavigator = createAnimatedSwitchNavigator(
  {
    AuthLoading: { screen: AuthLoadingScreen },
    UnAuth: { screen: UnAuthNavigator },
    Main: { screen: HomeNavigator },
  },
  {
    // The previous screen will slide to the bottom while the next screen will fade in
    transition: (
      <Transition.Together>
        <Transition.Out
          type="slide-left"
          durationMs={400}
          interpolation="easeInOut"
        />
        <Transition.In type="slide-right" durationMs={500} />
      </Transition.Together>
    ),
  }
)
Mã của file screens/AuthLoadingScreen.js
import React, { Component } from 'react'
import { createAction } from '../utils';
import { Loading } from '../components';
import { connect } from 'react-redux';

@connect(({ app }) => ({ ...app }))
class AuthLoadingScreen extends Component {
  componentDidMount() {
    this.checkAuth()
  }

  checkAuth = async () => {
    const { dispatch } = this.props
    const isLogin = await dispatch(createAction('app/fetchLogin')())
    this.props.navigation.navigate(isLogin ? 'Main' : 'UnAuth')
  };

  render() {
    return (
      <Loading />
    );
  }
}

export default AuthLoadingScreen
Với dispatch(createAction(‘app/fetchLogin’)()) là kiểm tra người dùng đã đăng nhập hay chưa bằng cách đọc dữ liệu accessToken từ storage, và trả về true hoặc false
Hiện thực một user case mẫu
Ở user case này, mình sẽ mô tả 1 ứng dụng react native, lúc mở ứng dụng lên sẽ có màn hình đang tải để kiểm tra người dùng đã đăng nhập trước đó hay chưa, nếu đã đăng nhập rồi thì điều hướng đến màn hình chỉnh của ứng dụng (MainScreen), ngược lại thì điều hướng đến màn hình đăng nhập (LoginScreen)
Ở mà hình LoginScreen, người dùng nhập vào thông tin username và mật khẩu và bấm nút đăng nhập, dữ liệu người dùng sẽ được gởi lên server và trả về accessToken (JWT), accessToken sẽ được lưu trữ tại ứng dụng bằng storage của điện thoại và dùng cho mổi lần yêu cầu lên api để lấy dữ liệu
Khởi tạo ứng dụng
Sử dụng lệnh: react-native init ReactNativeDvaTemplate
Cài đặt các package cần thiết
Cần đặt các package theo package.json mình cung cấp
{
"dependencies": {
    "@react-native-community/masked-view": "^0.1.7",
    "@react-native-community/viewpager": "^3.3.0",
    "dva-core": "^2.0.2",
    "dva-loading": "^3.0.20",
    "lodash-decorators": "^6.0.1",
    "moment": "^2.24.0",
    "react": "16.9.0",
    "react-native": "0.61.5",
    "react-native-animatable": "^1.3.3",
    "react-native-config": "^0.12.0",
    "react-native-gesture-handler": "^1.6.0",
    "react-native-linear-gradient": "^2.5.6",
    "react-native-paper": "^3.6.0",
    "react-native-reanimated": "^1.7.0",
    "react-native-safe-area-context": "^0.7.3",
    "react-native-screens": "^2.2.0",
    "react-native-scrollable-tab-view": "^1.0.0",
    "react-native-snackbar": "^2.2.0",
    "react-native-vector-icons": "^6.6.0",
    "react-navigation": "^4.2.2",
    "react-navigation-animated-switch": "^0.5.2",
    "react-navigation-material-bottom-tabs": "^2.2.4",
    "react-navigation-redux-helpers": "^4.0.1",
    "react-navigation-stack": "^2.2.3",
    "react-navigation-tabs": "^2.8.2",
    "react-redux": "^7.2.0",
    "redux": "^4.0.5"
  },
  "devDependencies": {
    "@babel/core": "^7.8.7",
    "@babel/plugin-proposal-decorators": "^7.8.3",
    "@babel/runtime": "^7.8.7",
    "@react-native-community/eslint-config": "^0.0.7",
    "babel-jest": "^25.1.0",
    "babel-plugin-transform-remove-console": "^6.9.4",
    "eslint": "^6.8.0",
    "jest": "^25.1.0",
    "metro-react-native-babel-preset": "^0.58.0",
    "react-test-renderer": "16.9.0"
  }
}
Sau khi cài đặt các package xong, mình vào thư mục ios, chạy lệnh: pod install để cài đặt dependencies tương ứng cho ios, với phiên bản react native 0.60 trở về sau thì mình không cần chạy thêm react-native link của các package có yêu cầu, việc này được thực hiện tự động
Tạo thư mục với kiến trúc theo chuẩn dva
Kiến trúc thư mục này mình đã có mô tả ở phía trên, từng thư mục với chức năng mổi thư mục là gì


1 Comment