
Bài viết này mình sẽ tạo một ứng dụng đơn giản kết hợp Vue3 với Pinia để chúng ta có một cái nhìn tổng quan khi làm việc với Vue3, Pinia, Typescript nó sẽ như thế nào. Hiện tại thì Pinia đã được khuyến khích dùng thay thế cho Vuex trên tài liệu chính thức của VueJS, và Pinia cũng có phiên bản hổ trợ khi làm việc với NuxtJS
Tech stack ở bài này bao gồm:
- Vue3
- Pinia
- Typescript
- Vite
Đầu tiên khởi tạo dự án với Vite, chọn template là vue-ts
npm create vite@latest vue3-pinia --template vue-ts
Sau khi chạy lệnh trên xong thì ta có được 1 thư mục vue3-pinia, mặc định thì package.json file chỉ có package vue chúng ta cài thêm 2 package nữa là pinia (state management) và route-router (quản lý định tuyến cho toàn ứng dụng).
{
  "name": "vue3-pinia",
  "private": true,
  "version": "0.0.0",
  "type": "module",
  "scripts": {
    "dev": "vite",
    "build": "vue-tsc && vite build",
    "preview": "vite preview"
  },
  "dependencies": {
    "pinia": "^2.1.7",
    "vue": "^3.3.4",
    "vue-router": "^4.2.5"
  },
  "devDependencies": {
    "@vitejs/plugin-vue": "^4.2.3",
    "typescript": "^5.0.2",
    "vite": "^4.4.5",
    "vue-tsc": "^1.8.5"
  }
}
Sau đó chạy lại lênh npm install để install các package mới
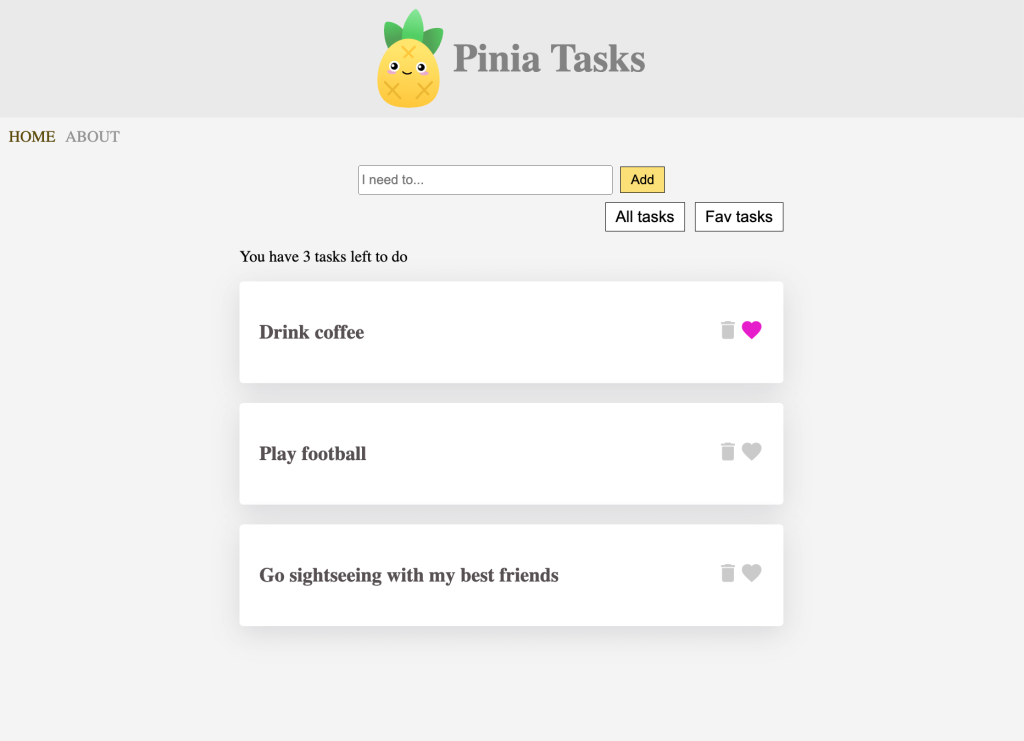
Giao diện mã chúng ta sẽ làm như hình bên dưới
- Trang chủ 1 input để thao tác thêm task mới, 2 button cho phép lọc cái task theo “All tasks” hoặc “Fav tasks”, 1 danh sách các tasks cần phải làm có tính năng xóa và yêu thích.
- Trang about us
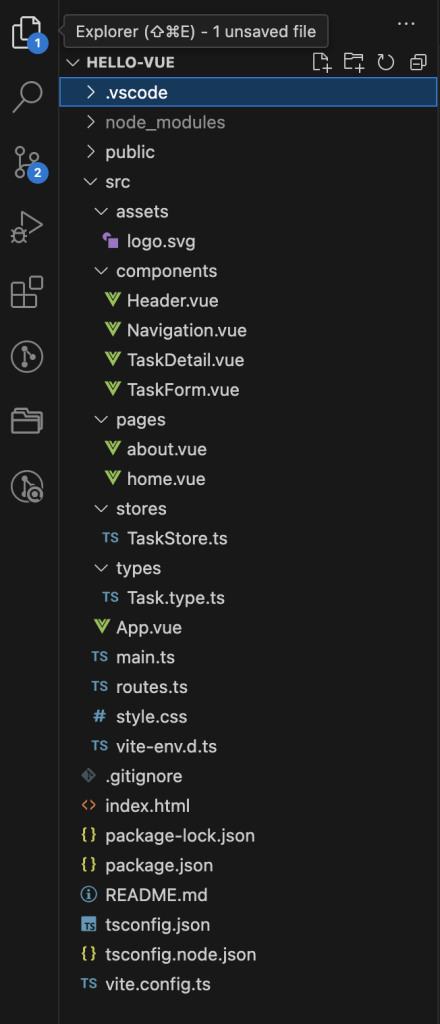
Tổng thể về kiến trúc thư mục của ứng dụng “Pinia Tasks”
Ở kiến trúc thư mục đơn giản như trên thì mình có:
- pages: gồm có 2 trang là home và about
- components: khai báo các components được dùng trong ứng dụng (Header, Navigation, TaskForm, TaskDetail)
- types: khai báo kiểu của dữ liệu
- stores: khai báo state của ứng dụng (TaskStore.ts)
- routes.ts: định nghĩa định tuyến cho toàn bộ ứng dụng
- style.css: style cho toàn ứng dụng
- main.ts: nội dung mã chính của ứng dụng sẽ được chạy đầu tiên
routes.ts
import { createRouter, createWebHashHistory } from "vue-router";
const HomePage = () => import("./pages/home.vue");
const AboutPage = () => import("./pages/about.vue");
export const routes = [
  { path: "/", component: HomePage },
  { path: "/about", component: AboutPage },
];

export const router = createRouter({
  // 4. Provide the history implementation to use. We are using the hash history for simplicity here.
  history: createWebHashHistory(),
  routes, // short for `routes: routes`
});
main.ts
import { createPinia } from "pinia";
import { createApp } from "vue";
import App from "./App.vue";
import { router } from "./routes";
import "./style.css";

createApp(App).use(router).use(createPinia()).mount("#app");
App.vue
<script setup lang="ts">
import Header from "./components/Header.vue";
import Navigation from "./components/Navigation.vue";
</script>

<template>
  <Header />
  <Navigation />
  <!-- container -->
  <div class="container">
    <!-- route outlet -->
    <router-view></router-view>
  </div>
</template>

<style scoped></style>
khi làm việc với Typescript trong ứng dụng Vue ta cần thêm attribute lang=”ts” cho thẻ script như trên
Định nghĩa kiểu dữ liệu types/Task.type.ts
export type Task = {
  id: number;
  title: string;
  isFav: boolean;
};
Định nghĩa store: stores/TaskStore.ts
import { defineStore } from "pinia";
import { Task } from "../types/Task.type";

export const useTaskStore = defineStore("taskStore", {
  state: () => ({
    tasks: [
      { id: 1, title: "Drink coffee", isFav: true },
      { id: 2, title: "Play football", isFav: false },
      { id: 3, title: "Go sightseeing with my best friends", isFav: false },
    ],
    name: "Pinia Tasks",
  }),
  getters: {
    favs: (state) => state.tasks.filter((task) => task.isFav),
    favCount: (state) => {
      return state.tasks.reduce((p, c) => {
        return c.isFav ? p + 1 : p;
      }, 0);
    },
    totalCounter: (state) => state.tasks.length,
  },
  actions: {
    addTask(task: Task) {
      this.tasks.push(task);
    },
    deleteTask(taskId: number) {
      this.tasks = this.tasks.filter((task) => task.id !== taskId);
    },
    toggleTask(taskId: number) {
      this.tasks = this.tasks.map((task) => {
        if (task.id === taskId) {
          return { ...task, isFav: !task.isFav };
        }
        return task;
      });
    },
  },
});
Để định nghĩa store với Pinia ta dùng hàm defineStore, trong 1 store của Pinia thì có những thành phần con
- name: tên của store (taskStore)
- state: khai báo state ban đầu của taskStore, bao gồm: name và tasks
- getters: định nghĩa các property sẽ đc đọc ra từ Vue template (.vue file)
- actions: định nghĩa những sự kiện được dùng (addTask, deleteTask, toggleTask)
Và cách sử dụng store trong Vue template file như sau
<template>
  <form @submit.prevent="handleSubmit">
    <input v-model="newTask" placeholder="I need to..." type="text" />
    <button type="submit">Add</button>
  </form>
</template>

<script setup lang="ts">
import { ref } from "vue";
import { useTaskStore } from "../stores/TaskStore";

const taskStore = useTaskStore();
const newTask = ref("");
const handleSubmit = () => {
  if (newTask.value.length > 0) {
    taskStore.addTask({
      isFav: false,
      id: Math.floor(Math.random() * 1000000),
      title: newTask.value,
    });
    newTask.value = "";
  }
};
</script>
Theo mình thì nó khá giống với kiểu bên React đang dùng React hook :), có lẽ Pinia được xây dựng trên ý tưởng là như vậy để cho rồi thì mọi developer của những framework FE khác đều có thể chuyển đổi dùng qua các framework khác 1 cách dễ dàng hơn nên mình thấy khá là tiện khi từ 1 coder ReactJS chuyển qua Vue3 với Pinia
Để hình dung được cách sử dụng Typescript trong Vue template các bạn xem đoạn mã trong file TaskDetail.vue sau
<template>
  <div class="task-detail">
    <h3 class="task-detail_title">{{ task.title }}</h3>
    <div class="icons">
      <i class="material-icons" @click="deleleTask">delete</i>
      <i
        class="material-icons"
        @click="toggleTask"
        :class="{ isFav: task.isFav }"
        >favorite</i
      >
    </div>
  </div>
</template>

<script setup lang="ts">
import { useTaskStore } from "../stores/TaskStore";
import { Task } from "../types/Task.type";

const props = defineProps<{ task: Task }>();

function deleleTask() {
  if (confirm("Do you want to delete this task?")) {
    taskStore.deleteTask(props.task.id);
  }
}

function toggleTask() {
  if (confirm("Do you want to toggle favourite this task?")) {
    taskStore.toggleTask(props.task.id);
  }
}
const taskStore = useTaskStore();
</script>

<style scoped></style>
Ở đây, chúng ta dùng hàm const props = defineProps<{ task: Task }>(); để định nghĩa các props sẽ được truyền vào trong TaskDetail component này. defineProps là hàm generic không có tham số đầu vào nhưng chúng ta định nghĩa thông qua generic của hàm là 1 object chứa tất cả các input type của component. Ví dụ ở trên là sẽ có 1 thuộc tính đầu vào là task kiểu Task
<!-- task list -->
  <div class="task-list" v-if="filter === 'all'">
    <p>You have {{ taskStore.totalCounter }} tasks left to do</p>
    <div v-for="task in taskStore.tasks" :key="task.id">
      <TaskDetail :task="task" />
    </div>
  </div>
Và để sử dụng được Typescript type check cho dự án Vue hổ trợ Typescript các bạn phải cài thêm extension TypeScript Vue Plugin (Volar) trên vscode nhé
Link sourcecode: https://github.com/truongluu/vue3-pinia
Happy coding 🙂

